In this article we see how can we install Jenkins on ubuntu. Jenkins is an automation engine that supports continuous integration and automated testing.
To follow the tutorial you should need ubuntu 16 machine (or later) with the credentials (password or private key) of the root user in the machine and its domain name. In this tutorial, the domain of the host which serve Jenkins is my-jenkins.com so to follow this tutorial replace this value to your domain name.
If your machine does not have a domain yet, you can add a new mappings of IP address to my-jenkins.com in hosts file in your local machine. This file is usually located in C:\Windows\System32\driversetc\hosts in Windows or /etc/hosts in Linux. See
 127.0.0.1       localhost
 100.101.50.51   my-jenkins.com
Step 1 – Connect via ssh to the machine.
 $ ssh my-jenkins.com
 login as: root
 Authenticating with public key "rsa-key_2016-08-01-jenkins"

 Welcome to Ubuntu 16.04.1 LTS (GNU/Linux 4.4.0-34-generic x86_64)
 ....
 root@jenkins:~#
Step 2 – Add Jenkins Package Repositories As Sources of apt-get
 root@jenkins:~# curl --silent http://pkg.jenkins-ci.org/debian/jenkins-ci.org.key | sudo apt-key add -
 OK
 root@jenkins:~# echo "deb http://pkg.jenkins-ci.org/debian binary/" >> /etc/apt/sources.list.d/jenkins.list
 root@jenkins:~# sudo apt-get update
 ...
 Fetched 825 kB in 1s (785 kB/s)
 Reading package lists... Done
Step 3 – Update the system
 root@jenkins:~# sudo apt-get update
 ...
 Fetched 825 kB in 1s (785 kB/s)
 Reading package lists... Done
Step 4 – Install apache2
We will use apache2 to serve jenkins via proxy_http apache module. First, Install apache2 and jenkins.
 root@jenkins:~# sudo apt-get install jenkins apache2
 Reading package lists... Done
 Building dependency tree
 Reading state information... Done
 The following additional packages will be installed:
 ...
 Suggested packages:
 ...
 The following NEW packages will be installed:
 ...
 Do you want to continue? [Y/n] Y
 ...
Step 5 – Enable proxy modules
Enable proxy and proxy_http apache modules. This is straightforward task since apache2 package offers the a2enmod and a2dismod commands (a2enmod allows to enable apache module, while a2dismod allows to disable apache module).
 root@jenkins:~# sudo a2enmod proxy
 Enabling module proxy.
 To activate the new configuration, you need to run:
     service apache2 restart
 root@jenkins:~# sudo a2enmod proxy_http
 Enabling module proxy_http.
 To activate the new configuration, you need to run:
     service apache2 restart
Step 6 – add jenkins site
Create a new jenkins.conf file at /etc/apache2/sites-available/. In this file we will define a new a site (virtual host) to our Jenkins web application. We will use nano text editor, but you can use any text editor you are familiar with:
root@jenkins:~# nano /etc/apache2/sites-available/jenkins.confNow, add the following content to the file. Replace the my-jenkins.com with your domain name.
 <VirtualHost *:80>
     ServerName        my-jenkins.com
     ProxyRequests     Off
     ProxyPreserveHost On
     ProxyPass         / http://localhost:8080/
     <Proxy *>
         Order deny,allow
         Allow from all
     </Proxy>
 </VirtualHost>
Step 7 – Enable Jenkins site
Enable Jenkins web application. It is straightforward task as apache2 package offers the a2ensite and a2dissite commands (a2ensite allows to enable a site, while a2dissite allows to disable a site)
 root@jenkins:~# a2ensite jenkins
 Enabling site jenkins.
 To activate the new configuration, you need to run:
     service apache2 reload
Step 8 – Reload apache
Now, we reload apache to reflect the changes we made
sudo service apache2 reloadStep 9 – Install jenkins
Now, we open http://my-jenkins.com in our browser and the following page should appear:

Now, you should fill the initial password from /var/lib/jenkins/secrets/initialAdminPassword and press Continue:
 root@jenkins:~# cat /var/lib/jenkins/secrets/initialAdminPassword
 password...
Step 10 – Customize Jenkins
The Customize Jenkins should appear. In this page, you can select which plugins to install in order to extend Jenkins with additional features.
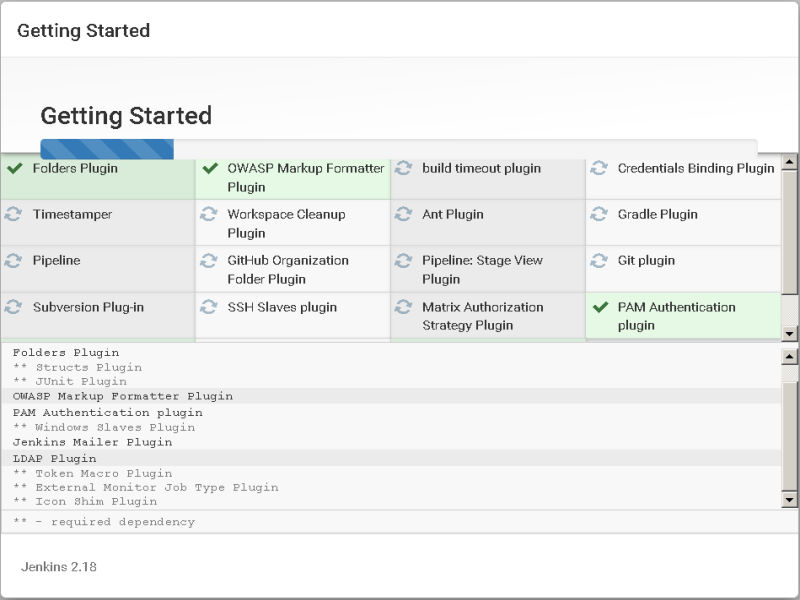
You can choose Install Suggested Plugins or Select plugins to install. When done, Jenkins will start to install plugins:

Step 11 – Create First Admin User
The Create First Admin User page should appear:

Fill the details and click in Save and Finish.
Step 12 – Jenkins is ready
Congratulations, Jenkins is ready to use! Now, you can build,deploy and automate your project.

12 Easy Steps to install Jenkins
Duration 1 hour
-
Connect via ssh to the machine
-
Add Jenkins Package Repositories
-
Update the system
-
Install apache2
-
Enable proxy modules
-
Add Jenkins Site
-
Enable Jenkins site
-
Reload Apache
-
Install Jenkins
-
Customize Jenkins
-
Create First Admin User
-
Jenkins is ready